Using Printer Profiles with Digital Labs

This document assumes a familiarity with how to set up and use Photoshop's color management. If you are in doubt, please read either the brief tutorial on our site or one of the more extensive articles referenced in our list of resources. This also assumes you are using Photoshop version 6 or above. If not, get a new version. The price of a Photoshop upgrade is definitely worth the money for the time savings alone. If you use an image editing program other than Photoshop, make sure it supports converting image files to a printer profile. The basic flow is, however, approximately the same.

If you are looking for custom ICC profiles for your printer and instructions on how to use them, please refer to our custom profiling section.

bullet
Important note #1: All profiles assume an accurately calibrated and profiled monitor. The goal of printer profiles is to match your prints to your monitor. If the condition of your monitor is not known accurately, there is nothing to match the prints to. The viewing condition for the prints is also critical. Unless otherwise noted, our profiles are built for print viewing under industry standard D50 (~5000°K) illumination.
bullet
Important note #2: Our digital lab profiles are created specifically for each individual printer. These are not generic profiles, nor should they be treated as such. Each printer and paper combination behaves differently. Using highly optimized profiles on a printer other than the one they were made for can result in worse performance than using no profile at all.

After downloading the profile, you need to save it in a location that depends on what operating system you are using. The profile files work equally well on Windows or Mac computers. Save the profile to a handy location. You need to install profiles before using them. Note that the profiles are binary files – they do not contain readily readable information and can not be opened directly by most applications. Image editing applications such as Photoshop and color printer drivers are equipped to use them.

These locations are:


Other applications supporting conversion to printer profiles:


Notable applications that do not support converting images to RGB printer ICC profiles:


Example color managed editing and printing workflow

The following work flow is a guide to using our profiles and getting the best quality prints. It contains additional information specifically for Fuji Frontier, Noritsu, and Agfa digital printers, as these are the ones most commonly found in labs. A more comprehensive version that applies to any printer and covers Photoshop Color Management is in our tutorial series.
  1. Edit the image until you are happy and save the file. Do all your editing in a standard color space such as Adobe RGB or sRGB, not a printer profile. Editing color spaces are designed for editing. Printer color spaces are not. At this point you have an image that can be printed on any printer.
  2. Make a duplicate of the image. This allows you to keep the original as a printer-independent version, which can then be formatted for any other output medium.
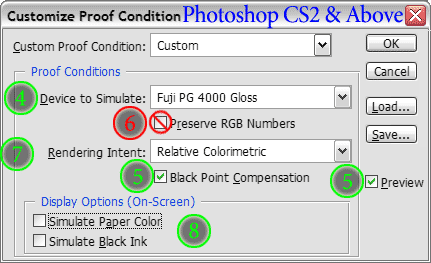
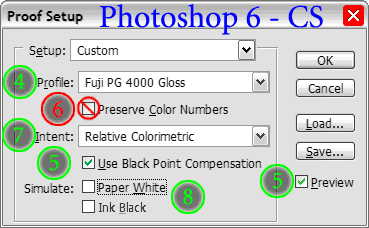
  3. Select the duplicate, and open the Proof Setup dialog (View→Proof Setup→Custom). The screen shots below show the Proof Setup dialog boxes for multiple versions of Adobe Photoshop.
Photoshop CS2 Proof Setup Proof Setup Options
  1. Select the profile to use from the drop-down list in the Proof Setup dialog box.
  2. Check the Preview box and turn on Black Point Compensation to accurately scale the black level in your image to the printer's black.
  3. Do not select Preserve Color Numbers. This shows how your image would look if you did not do a color space conversion — just the opposite of what you want.
  4. Experiment with rendering intent. You can quickly switch between rendering intents in the Soft Proof dialog - just have the Preview option checked. Relative Colorimetric often gives the best results. Perceptual or Saturation can be better if your image contains many out-of-gamut colors. Absolute Colorimetric rendering is often used for mid-stage print proofing; if you are familiar with this, you don't need this document.
    • Relative Colorimetric rendering produces superior fidelity to your original image if the image does not contain many colors falling outside the printer's range. If a particular color can be reproduced accurately, it is passed through unchanged. If not, the color is moved to a nearby, printable color. Images containing broad swaths of highly saturated colors – a field of wildflowers is a worst-case example – can print with color bands in what should be smooth gradients if Relative Colorimetric rendering is used.
    • Perceptual Rendering minimizes color banding while preserving the overall feel of the image. This means that all colors get altered, whether or not they can be reproduced accurately, a necessity to prevent weird artifacts in printable colors, We make use of this flexibility to open shadows and feather highlights to an extent not possible with Relative Colorimetric. Images with areas of highly saturated color benefit from Perceptual rendering. If you see color banding in the soft proof with Rel. Color. selected, try Perceptual. With experience you will get a feel for which images best pair with each rendering intent.
    • Finally, there is the Saturation rendering intent. Traditional profiles reserve it for printing business graphics or PowerPoint slides where all that matters is reproducing saturated primary colors cleanly. This isn't of much use to photographers, so we use the Saturation tables to hold a rendering intent that balances between Perceptual and Relative Colorimetric with added emphasis on preserving overall saturation. For prints where an added punch is desirable, our Saturation rendering implementation is often the best choice. Note that some image processors, notable Lightroom, do not allow use of Saturation rendering for output – as noted above, only Dry Creek Photo's profiles offer a photographically-useful Saturation output rendering option.
    • Note: If you have setups that you use frequently, they can be saved using the "Save" button in the Proof Setup dialog. This makes the setting available directly from the View→Proof Setup menu.
    • If you wish to save a proof setup as the default, hold down the Alt/Option key. The "Save" button changes into "→Default". Push the button to save the selected proof setup as Photoshop's default.
  5. Simulation options:
    • These attempt to show the reduced contrast range the printed page will have vs. what your monitor can show. Without them you will have an over-optimistic view of the final contrast.
    • It is easiest to perform any major color and tonal adjustments without Simulate Paper Color (Photoshop CS2 and above) or Paper White (Photoshop 6.0 through CS) or Ink Black checked.
    • The Simulate Black Ink (Photoshop CS2 and above) or Ink Black (Photoshop 6 through CS) simulation should be checked to see if the shadow detail in your source image will hold up in print. This is particularly important for images with significant shadow detail. If your shadow details disappear, selective dodging can bring them back.
    • Simulate Paper Color/White attempts to show the effects of the difference between your monitor's white level and the (usually) less bright paper. This simulation is less accurate than the Ink Black, but can be helpful for ensuring critical highlight details hold up.
      • When you check the Simulate Paper Color box, the look of the image will likely change dramatically. This is an artifact of Photoshop trying to make the light emitted from your monitor match the look of light reflected from the printed page. The simulation works best if all white user interface elements (toolbars, palettes, etc. ) are hidden. Use Photoshop's Full Screen mode for the most accurate view, and glance away as you switch the simulation on
  6. If you do not see significant changes when soft proofing, this is OK. This means your image contains colors that mainly lie within the printer's gamut. If the images do not match well enough, the following steps can help.
  7. Set the highlight and shadow points in the Levels dialog box. In Photoshop, hold down Alt/Option while adjusting the level sliders. This will show any shadow or highlight clipping that occurs. The ideal setting is usually the point right before clipping occurs.
  8. If the duplicate image that you are Soft Proofing looks greatly different from the original, minor curves or color balance adjustments are often all that are needed to bring things into line.
    • What's going on? The problem is that your monitor screen is capable of showing a much wider contrast range (usually 300x or more between black and white) than is the printed page. By adjusting the Soft Proof image you can visually compensate for some of the discrepancy. An intelligent levels adjustment, or slight boost to saturation is usually all it takes to give your prints the needed pop.
  9. An optional step is to check the image for out-of-gamut colors. Using a selected color range, you can (in order of preference) reduce the lightness, tweak the hue, or very slightly reduce the saturation to bring the problem colors within gamut. Note that all your edits are being performed in the file's editing color space rather than in the printer color space. This makes edits more predictable and controllable.
  10. You're almost done. If you are using a Fuji Frontier, make sure your image is at one of the supported image sizes, and at 300 ppi. For example, a 4x6 image should be 1200x1800 pixels.
  11. Noritsu printers should be fed 400 ppi files for 2xxx MLVA series machines and either 300 or 320 ppi files for the 3xxx Laser series (see below). Noritsu files must have very close to the correct aspect ratio, e.g. 2:3 for a 4x6 print. Do not print files on a Noritsu with resolution higher than these values, or significant cropping may occur.
  12. Cropping: This is a problematic step for many photographers. The default printing mode crops a random (~0.1"/2mm) amount off one or more edges of your prints. If you do not have critical details near the edges of your shots, you can safely ignore the cropping. Other options include:
    • Ask for your files to be printed using the "No Resize" option. Most labs do not offer this option as it is incompatible with images that are not sized exactly. It is, however, the only way to get exact sizing.
    • Add some extra pixels to the canvas to compensate. A chart of suggested values for Fuji Frontier and Noritsu printers is given below. There are no exact dimensions to use for all printers, and you will find it varies a pixel or two with each new paper roll on the same printer.
    • Have your prints made with borders. This is useful only if you plan on matting the prints. Very few labs have their printers adjusted carefully enough to produce even borders.
  13. Finally, convert the image to the appropriate profile, using your chosen rendering intent. In Photoshop CS2 and above the command is Edit→Convert to Profile. Earlier Photoshop versions use Image→Mode→Convert to Profile. Frontier and Noritsu printers do not read embedded profiles, so the image data must be converted. This changes the data in the file to compensate for how your lab's machine actually prints colors.
    • If you were Soft Proofing with Simulate Paper White enabled, you will notice a sudden change in the image appearance. Photoshop turns off the Paper White simulation when you do a profile conversion. Do not worry - this will not change your print quality.
    • In the profile conversion dialog box, select the Use Black Point Compensation, Use Dither, and Flatten Image check boxes, if available.
  14. Save the file as an RGB jpeg or tiff.
    • Jpeg images saved at maximum quality provide identical print quality to tiff images. Because of the smaller file size, they print much faster.
    • If using tiffs, they must be RGB format, 8-bit, uncompressed, and have no layers or alpha channels. Many photo labs either do not support printing tiff images, or at least not for online submissions. In this case, as noted above, a maximum quality jpeg will give visually identical results for
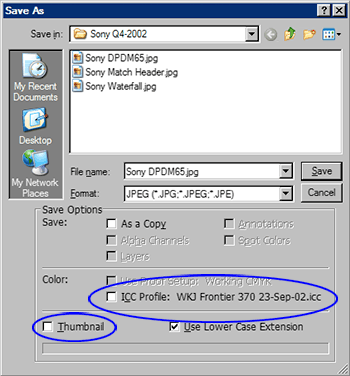
    • Embedding the profile in the image is optional. It is convenient for viewing the profiles later, as you do not need to manually assign the correct profile to see accurate colors. A drawback is that this adds 2MB to the size of each image. We previously recommended against embedding profiles because of incompatibility with the front-end drivers used by photo lab printers. All reasonably up-to-date printer drivers now accept images with embedded profiles, so this is no longer a concern.
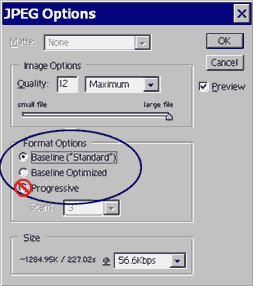
    • If you are saving the file as a jpeg, use one of the "Baseline" format options. The "Standard" option works with all Printers. Support for the "Optimized" baseline format requires newer printer drivers. The Optimized format gives improved color rendition and smaller file size. The "Progressive" scan option will not print on most Frontier and Noritsu machines. Also, do not use the JPEG2000 format; this is not recognized by most current printer driver versions.

    Save As  JPEG Options

  15. Instruct the print operators not to apply any of the automated image enhancement or adjustments to your files. Something along the lines of "send the files straight to the printer" usually works. If the lab operator is more technically savvy, request one of the following:
    • Fuji Frontier: No Corrections. A few labs use the PIC Pro module which allows printing in the "Import No Convert" mode. This gives a greater color range in saturated cyan tones. If the lab does not know what this is, or tells you that the mode is disabled, don't worry.
      • The FDIA/Image Intelligence auto-corrections and image enhancements must be disabled in the PIC module.
    • Noritsu QSS: Digital Media Corrections disabled, DSA/Judgment Image Correction disabled. If you are printing from Compact Flash or other media that is not a CD, make sure the operators disable all the Digital Media Corrections options, not just the "Usual Media" option.
    • Kiosks: Most Fuji Frontier PIC and Noritsu QSS kiosk software automatically resizes and performs additional jpeg compression on images sent through the kiosk. The goal is maintaining "good enough" image quality while speeding up print throughput. If you are going to the trouble of using ICC profiles and color managing your prints, you obviously are after something better than "good enough." Ask the lab technicians whether there is a means of disabling corrections for images printed through the kiosk. We and our clients have worked with both Fuji and Noritsu to have this capability implemented in the standard QSS (Noritsu) and PIC (Fuji) kiosk front-ends. Whether these settings are available and honored by the printer are up to the individual lab's setup. Many labs no longer accept media directly from their customers, as the controller computers are susceptible to viruses. In all cases, only use jpeg format for images printed through a kiosk. Other formats will be converted to highly compressed jpegs and, usually, resized to lower resolution.
    • Most Noritsu and some Frontier machines imprint a status string on the back of the prints that provides an indication of the print settings. If the status string exists, it may contain a series of numbers or letters, then the sequence N N N N followed by more numbers and letters. If any of the single "N" characters has a "+" or "-" sign following it, this shows one or more color channels was set to an adjusted value. For example if the string is N N N+2 N, one channel was bumped two notches. Tell the lab to reprint your files. This is also a useful check when you print files using a profile. Do not be concerned if there is no status string. Many labs do not print one.
      • Noritsu specific status strings: Example status strings are shown below:
      8121 11  N N N N  ---  AC+02 Zxxx/xxx
        [1]      [2]    [3]   [4]    [5]
      • Field [1] can contain any of a number of pieces of information, including date, order number, print channel number, etc. None of this directly pertains to the printing mode.
      • Field [2] shows the print channel correction information for yellow, cyan, magenta, and density. Values other than a single N, with no "+" or "-" sign, indicate that a print channel was adjusted. For example, N+1 N N N indicates the yellow channel had a +1 correction applied. Have your files reprinted without corrections.
      • Field [3] should always be "– – –", or simply not be present. If "NN" appears here, the Noritsu Digital Image Auto Correction was enabled. This correction alters image color and tonal balance based on image content, with particular emphasis on facial recognition, making use of printer profiles impossible. If you see "NN", you are guaranteed that your prints will not accurately match how the profile is set up. Ask for your order to be reprinted with Digital Image Auto Correction disabled.
      • Field [4] will often not be present. That is ideal, as it means no automatic adjustments were applied. A list of common codes is below in approximate order of how frequently they appear. If any of these codes, or any other code is present with a "+/-XX" value, ask for the target to be reprinted with all Media Corrections and DSA (Digital Scan Adjustment)/Judgment Image Correction settings disabled.
        • AC: Auto-Contrast. The effect is similar to Photoshop's Auto Contrast command; sometimes useful for poorly exposed images, but often less than desirable for most work. The relative strength of the correction is shown by the numerical code: AC+02.
        • AS: Auto-Sharpness. This correction does not influence output color or tonality. Strictly speaking, our profiles will be accurate under these conditions. From a practical standpoint, however, your print quality will be less than ideal. The Auto Sharpness adjustment helps salvage a usable print from a blurry (e.g. shaky hand-held point-and-shoot) image. If you have sharpened your images for print already, however, the additional sharpening performed by the printer leads to exaggerated haloes around edges, crunchy skin tones, and loss of fine detail. A setting of AS+01 is barely visible, while the standard default of AS+04 is unkind to properly sharpened images. Using Photoshop's Unsharp Mask improves both control over the sharpening process and final print quality. We use PhotoKit Sharpener on a daily basis as a quick, excellent quality sharpening plug-in that works well in an automated workflow. FocalBlade is another superb sharpening product. It offers more precise control than PhotoKit Sharpener, but requires more manual adjustments.
        • GR: Digital ICE or, depending on the market, Grain-Reduction. Kodak's Digital ICE grain reduction algorithm attempts to smooth out high-iso noise from digital images or grain from film scans. The correction has a range of 1 to 10 with 10 being the strongest and a default level is 5. It can perform magic on film scans however the results are less optimal when applied to digital images. The effect is similar to using Photoshop's Dust and Scratches filter, with the default setting of GR05 being equivalent to using a smoothing radius of 2-3 in Photoshop. Using a more intelligent noise reduction algorithm prior to printing (Noise Ninja is a favorite of ours) gives better results than relying on the printer to fix your flaws. Any images not needing Digital ICE will be softened unnecessarily.
        • Other, less common, Noritsu auto-correction/DSA codes include SA, JN, TC, and EP. With the exception of EP, all are corrections that are not compatible with profiled images. EP is "Exposure Positioning" and is used to compensate for misalignment in the paper feed path. The EP adjustment does not affect output in any way.
      • Field [5] contains print sizing data and may or may not be present. Its value does not matter from a color perspective, however it can be used to check the output resolution for Noritsu Laser printers. If no resizing is performed the field will have a value of Z100.0/100.0. The numerator will often not be exactly 100%; values from 99.7 to 100.3 are typical and reflect the sizing parameters used for that particular printer. There is no single standard for Noritsu machines — most differ by a pixel or two in how large they assume a page is. For more details, see below.
        8121 11  N N N N  ---  Z100.1/100.0
        8121 11  N N N N  ---  Z106.7/100.0
        8121 11  N N N N  --- 5928 10.05.07 Z099.9/100.0

        All three examples above show typical Noritsu status strings when all autocorrections are disabled. These are what you want to see. The second string is an example of printing a 300 ppi image on an older Noritsu machine running at 320 ppi resolution. In most cases the scaling will not be visible; the internal Noritsu resizing algorithm is excellent. For maximum quality, however, you should pre-size your images to the native machine resolution and sharpen accordingly. The final example backprint status string is typically only found in prints made outside the United States. Some Noritsu implementations write a sequence number (5928 in the example above) followed by the date. Neither is cause for concern.


        8121 011  N+2 N N N  ---  Z100.1/100.0

        In this example, the cyan output was raised two units. The order of the 'N' fields are Cyan, Yellow, Magenta, and Density. If any of these are not simply 'N', the printer profiles will not be valid. Request the lab reprint your images.


        8121 011  N N N N  NN AS+04 Z100.1/100.0

        This status string illustrates an all too common problem. The "NN" indicates Digital Image Autocorrection was enabled. As described above, this algorithm adjusts each image individually, making the prints guaranteed not to match our profiles. When enabled, it is the most common cause of prints not matching the original images. Unfortunately, this setting is one that some lab techs are not aware of, and can remain enabled after all other corrections are turned off.


        8121 011  N N N N  --- AS+04 Z100.1/100.0

        Our next status string example shows the "Auto Sharpness" adjustment enabled at its default setting.


        8121 011  N N N N  ---  Z200.0/100.0

        The final status string above indicates the printer scaled the output size up by 2x (200%) in each dimension. For example, if an 8x12 inch print is made from an image sized for 4x6 inches (1200x1800 pixels), 200% scaling would be seen. If, however, your images are sized correctly for the print dimensions and you see a scaling factor that is more than 107%, your images may have been mangled by the QSS software. This typically only happens when printing from a lab's kiosk. Some kiosks automatically downsample images prior to sending the data to the printer. An image sized for 8x12 or even 12x18 inch prints can be downsampled to 1200x1800 pixels; i.e. reduced to 4x6 inch resolution. In some cases, an aggressive jpeg compression is applied as well. The printer then interpolates the image back up to the full resolution needed for the print. Needless to say, this process is not kind to print quality. Your large print looks, and in fact, is made from a tiny image, Depending on the lab you use and their setup, the lab techs may or may not be able to set the kiosk to not compress your images. If they can not, the only alternatives are to have the lab print directly off your media or to upload the images over the web. If, on the other hand, the scaling factor is much less than 100%, e.g. Z60.0/100.0( 60%), this indicates your image size was too large for the print size. Noritsu printers are temperamental when sent oversized files. There may be excessive cropping or print artifacts. The solution is to match your image dimensions to the desired print size.


Print Cropping/Suggested Fuji Frontier and Noritsu QSS print sizes

Notes:

Usage:

Fuji Frontier print cropping setup
Use "Fill In" print mode

Noritsu print cropping setup
Use "CUT" print mode

Paper Size (in)

Paper Size (mm)

Frontier Canvas Size (px)

Noritsu Print Size (in)

Noritsu 2xxx Canvas Size (px)

Noritsu 37xx, 34xx, and 3xxx Canvas Size (px) (300 ppi)

Older Noritsu 3xxx Canvas Size (px) (320 ppi)

4 102 1228 4x6 1630x2446 1228x1842 1310x1964
5 127 1524 5x7 2026x2836 1535x2149 1626x2276
6 152 1818 6x9 2430x3646 1818x2727 1940x2910
7 178 2138 8x10 3220x4026 2416x3020 2580x3226
8 203 2434 8x12 3220x4830 2416x3624 2580x3870
10 254 3036 11x14 4436x5646 3322x4228 3556x4526
12 305 3638 12x18 4836x7254 3624x5436 3876x5814
15 381 4536 12x24 n/a 3624x7248 n/a
18 457 5440 12x36 n/a 3624x10872 n/a
Printer Type Max. Paper Size (in)
Fuji Frontier Models
Frontier 330, 340, 390, 500 8x12
Frontier 355, 370, 375 10x15
Frontier 550, 570, 590 12x18
Frontier 710 8x24 or 8x36
 
Noritsu QSS Models
2901, 30xx, 3101, 3111 12x18
3411, 34-Pro, 37xx 12x36
 
Agfa Digital Models
d-Lab.1, 2, 3 12x18
Netlab.1 8x12
Netlab.2 12x18


© 2020, Dry Creek Photo. All Rights Reserved.

Home | Contact Us | Privacy Policy | Terms and Conditions