Printing options for legacy versions of Photoshop
It is easiest to print using the Print With Preview (File→Print With Preview) dialog in Photoshop. Using the Print dialog instead can have unpredictable consequences.
There are two printing flows you can choose. Which one depends on whether your image is in a standard, editing color space such as Adobe RGB, Pro Photo RGB, or sRGB or if the image is already converted to the printer profile.
Image in a standard working space:
If the image is in an editing color space you need to soft proof to the printer profile to get an accurate representation of how the final print will appear.
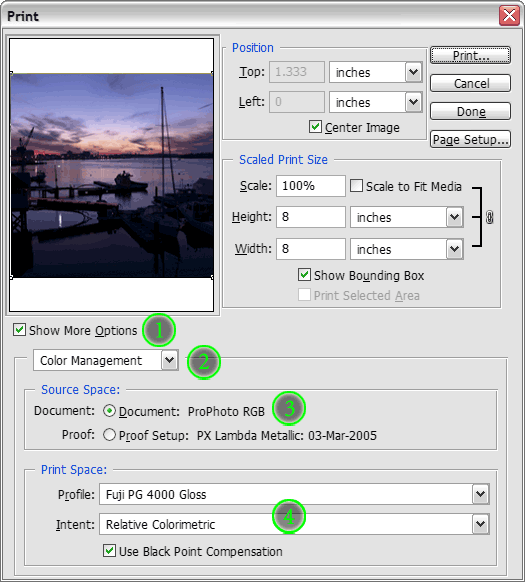
- Open the Print With Preview dialog. If you do not see the full dialog pictured below, check the "Show More Options" button.

- If it is not already selected, choose "Color Management" from the drop-down list.
- Select "Document" in the Print space.
- Select the printer profile and rendering intent you found to give the best results in the soft proof. Leave Black Point Compensation checked unless you have a specific reason to disable it — otherwise you run the risk of compressing all shadow details to black.
- You're ready to print. Make sure your printer setup is correctly matched to the profile you aim to use.
Image already converted to a printer profile
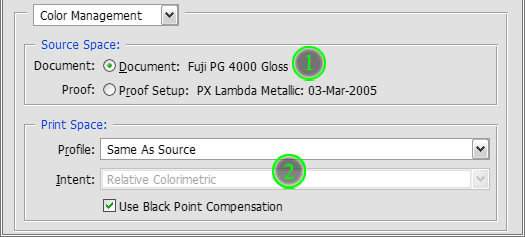
- This option is simpler than printing from a working color space, as the profile conversion is already performed. Select Document in the Print section. Your printer color space will appear automatically.
- Choose Same As Source in the Options section. The profile conversion is already performed and we do not want any further color management to take place.
- Print.

© 2020, Dry Creek Photo. All Rights Reserved.